Please Note: This article is not about how to create a template. We a couple of guides on how to setup Word and Email templates - Please note the email article does not instruct you on how to create an email template directly. Please see How to create HART Templates (Word Document) and also How to use WBE Email Templates in HART PMS
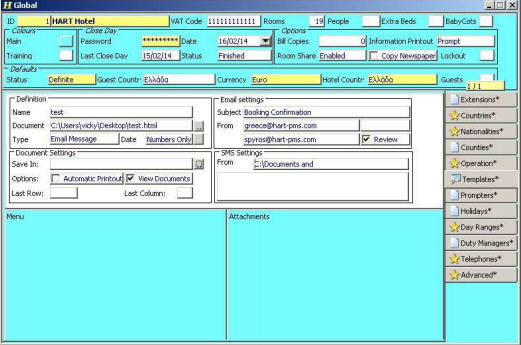
Go to the Configuration > Global > Templates tab:

Use the middle part of the window in order to attach your templates to HART PMS. This part of the window is separated in four parts:

Use the middle part of the window in order to attach your templates to HART PMS. This part of the window is separated in four parts:
- Definition (top left part).
- Document Settings (bottom left part).
- Email Settings (top right part).
- SMS Settings (bottom right part).
Let’s see what you need to enter here:
- Definition:
- Name: The name that you want your template to have.
- Document: Browse for the template by pressing the’…’ button.
We recommend using a UNC path where possible (\\computername\sharedfolder\).
Please Note: If using a UNC path you will need the full path to the file, for example: \\computername\sharedfolder\Templates\TemplateFileName.html
Also Note:: If using a UNC path, the destination folder must have the correct share permissions in order for everyone to access it. You may need IT assistance to set this up. - Type: Select the template file from the drop down menu.
- Email Message: If the template is an email message (.html).
- SMS (Text) Message: If the template is an sms message.
- Document: If the template is a word template file (.dotx)
- Date: Select if you want the date to appear Numbers Only or Full Text from the drop down menu.
HART TIP: You only need to fill one of the following sections per template. This is entirely dependant on the Type you choose above.
- Document Settings
- Save In: Browse for where you want to save the template in by pressing the '...' button on the right.
- Automatic Printout: Check if you want to get an automatic printout of the template.
- View Documents: Check if you want to view the document after it has been generated.
- Last Row: Key in the last row of the template that you want to use.
- Last column: Key in the last column of the template that you want to use.
- Email Settings:
- Subject: Key in the email’s subject as you want it to appear in the recipient’s inbox.
- From: Key in the name/department of the sender.
- CC: Key in the emails that you want the email to be notified to.
- Review: Check if you want to get a review of the email before it is sent - This is especially useful if you need to make manual adjustments to text.
- SMS Settings:
- From: Key in the name of the person/department you want to send the SMS from.
- Empty field: Key in the SMS itself.
Please Note: Email and SMS requires some additional setup. If these have not been configured, please Raise a Ticket.
How to link the templates to a window:
After you have finished entering all necessary information above, go to the bottom left part of the window –with the Menu indication- and link the template with specific HART PMS menus.
Right click and Add Entry and then select the menus from which you want the template to be available from, from the drop down menu.
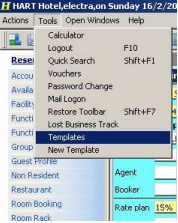
If you then go to the desired menus, you can go to Tools > Templates:

and select the desired template to use:

Please Note: This window will display all templates that are available to that window. If you do not see the template you want in this list, then you need to link it to the window with the above steps.
Was this article helpful?
That’s Great!
Thank you for your feedback
Sorry! We couldn't be helpful
Thank you for your feedback
Feedback sent
We appreciate your effort and will try to fix the article