By the end of this training article you will be able to:
- Create a course in HART
- Link Functions to courses
- Edit copy and imagery for selling tickets online
- Add payments policies, descriptions and link templates
- Create direct links to events
This training guide assumes you have the Cookery School/ Event ticketing engine set up online already. Please contact the support team for further guidance is set up is required.
Creating a course in HART
The ticketing engine is configured based on courses being available for events. For example, you may run a series of cookery courses throughout the year, or a series of tribute nights. These are individual events all grouped into a single type of event.
To create these courses, navigate to Configuration > Functions > Courses and add a new entry.
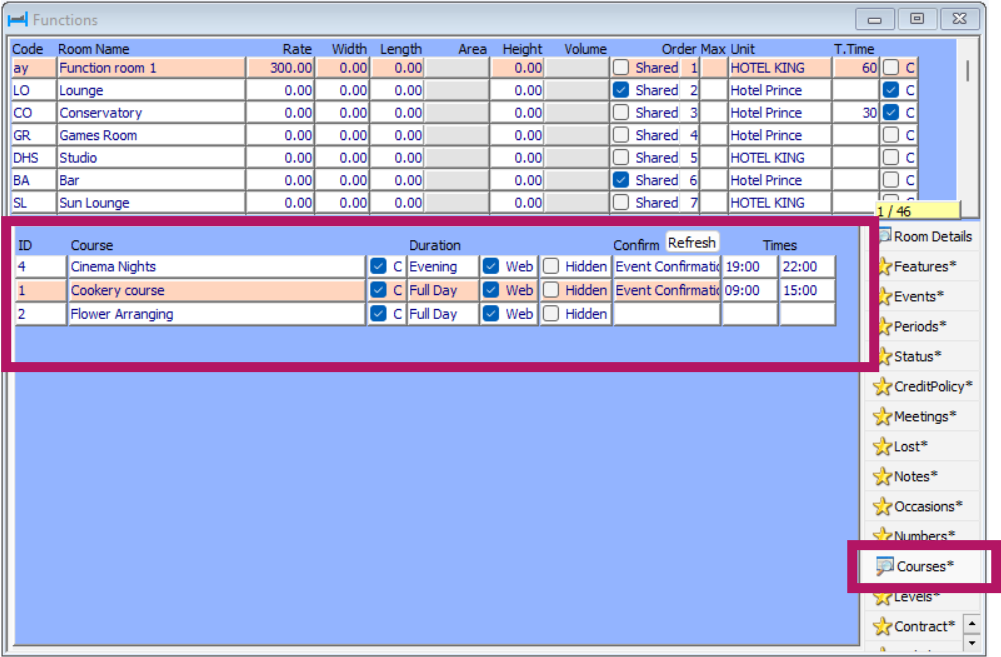
- ID: Automatically generated by HART on saving a new entry
- Course: The name of the course you are creating. This will be how they are grouped online
- C = Children allowed: Tick if children are allowed. This will enable or disable the children's box online
- Duration: Select if this is a full day, half day or evening event
- Web: Tick to enable this course for web bookings
- Hidden: Tick to make this a hidden that can only be accessed via a direct link
- Confirm: the confirmation template that should be linked to this course - please refer to the below for further details
- Times: As a default HART will take the earliest start time and latest end time of the function lines attached to your event (details below). This configuration will override this and set a specific start and end time of the event. This is useful where additional event lines will be used for e.g. set up information
Save your changes.
Linking confirmation templates
Confirmation templates should be loaded in cloud-reservations via Hotel > Templates
If one one template is required then the Cookery Confirmation should be completed. However it is also possible to create different templates for different types of events by complete the Event Confirmation templates - there are 10 available in total.
Once created within the PMS and Configuration > Functions > Courses press the Refresh button and close and re-open the window. In the drop down the completed templates will be available to link. Any course type not linked to a template will revert to the Cookery Confirmation by default.
Link Functions to courses
Open the function booking for the event you wish to sell tickets online for.

In the Courses drop down select the course from the drop-down section. Note, if you put a name in the Host field, this will show online as well.
Also, tick the web option.
Your event will now show online.
As note above the timings of your event will default to be the earliest start time to the latest finish time of the event lines attached to the event. To override this specific times should be put against the courses as per the configuration above.
HART Tip: In the main window of the function booking add a HOST name and this will be the sub header on the cookery engine.

Ticket pricing for the event is controlled via the Financials tab of the function:

If there are allocations within the ticket price they should be detailed here with the lines being added together to form the overall ticket price
Edit your online copy
In Cloud reservations, go to Sales > Functions > Events. Select the course from the dropdown menu and put in your wording.
Next, go to Hotel > Pictures > Cookery Course and upload any images for your courses.
Finally, in Hotel > Templates > Cookery Confirmation make sure you have a confirmation set up.
The following tags can be used.
$$Name$$
$$Title$$
$$Surname$$
$$Course$$
$$CourseDate$$
$$Adults$$
$$TotalRate$$
$$Host$$
There are now also under Hotel > Templates a number of new templates called Event Templates which you can use for different events.
We have left the original Cookery School confirmation names as such to avoid confusion for now, and that will be your fall-back default template for if you forget to assign a different one.
Please make sure you only have one entry per course on this grid otherwise you will have issues.
The Payment Master Switch for the entire cookery school in Sales > Setup > Cookery School.

Additionally you can then individually create payments terms and switch these on or off in Sales > Functions > Events. In here also the course, description and payment policy can be added. In Conf select the confirmation that you wish to link to that course.

Create direct links (URL)
You are able to set direct links to courses which can be used from your website to bypass the initial search page.
To do this, add the url extension ?courseID=
The ID number is the course ID found in HART under Configuration > Functions > Courses
Was this article helpful?
That’s Great!
Thank you for your feedback
Sorry! We couldn't be helpful
Thank you for your feedback
Feedback sent
We appreciate your effort and will try to fix the article